Before you go...
We built a free scorecard that shows how your heat pump, ventilation and solar systems are performing. Results are usually surprising.
Get my score
No thanks
We built a free scorecard that shows how your heat pump, ventilation and solar systems are performing. Results are usually surprising.
No thanksWe built a free scorecard that shows how your heat pump, ventilation and solar systems are performing. Results are usually surprising.
No thanks
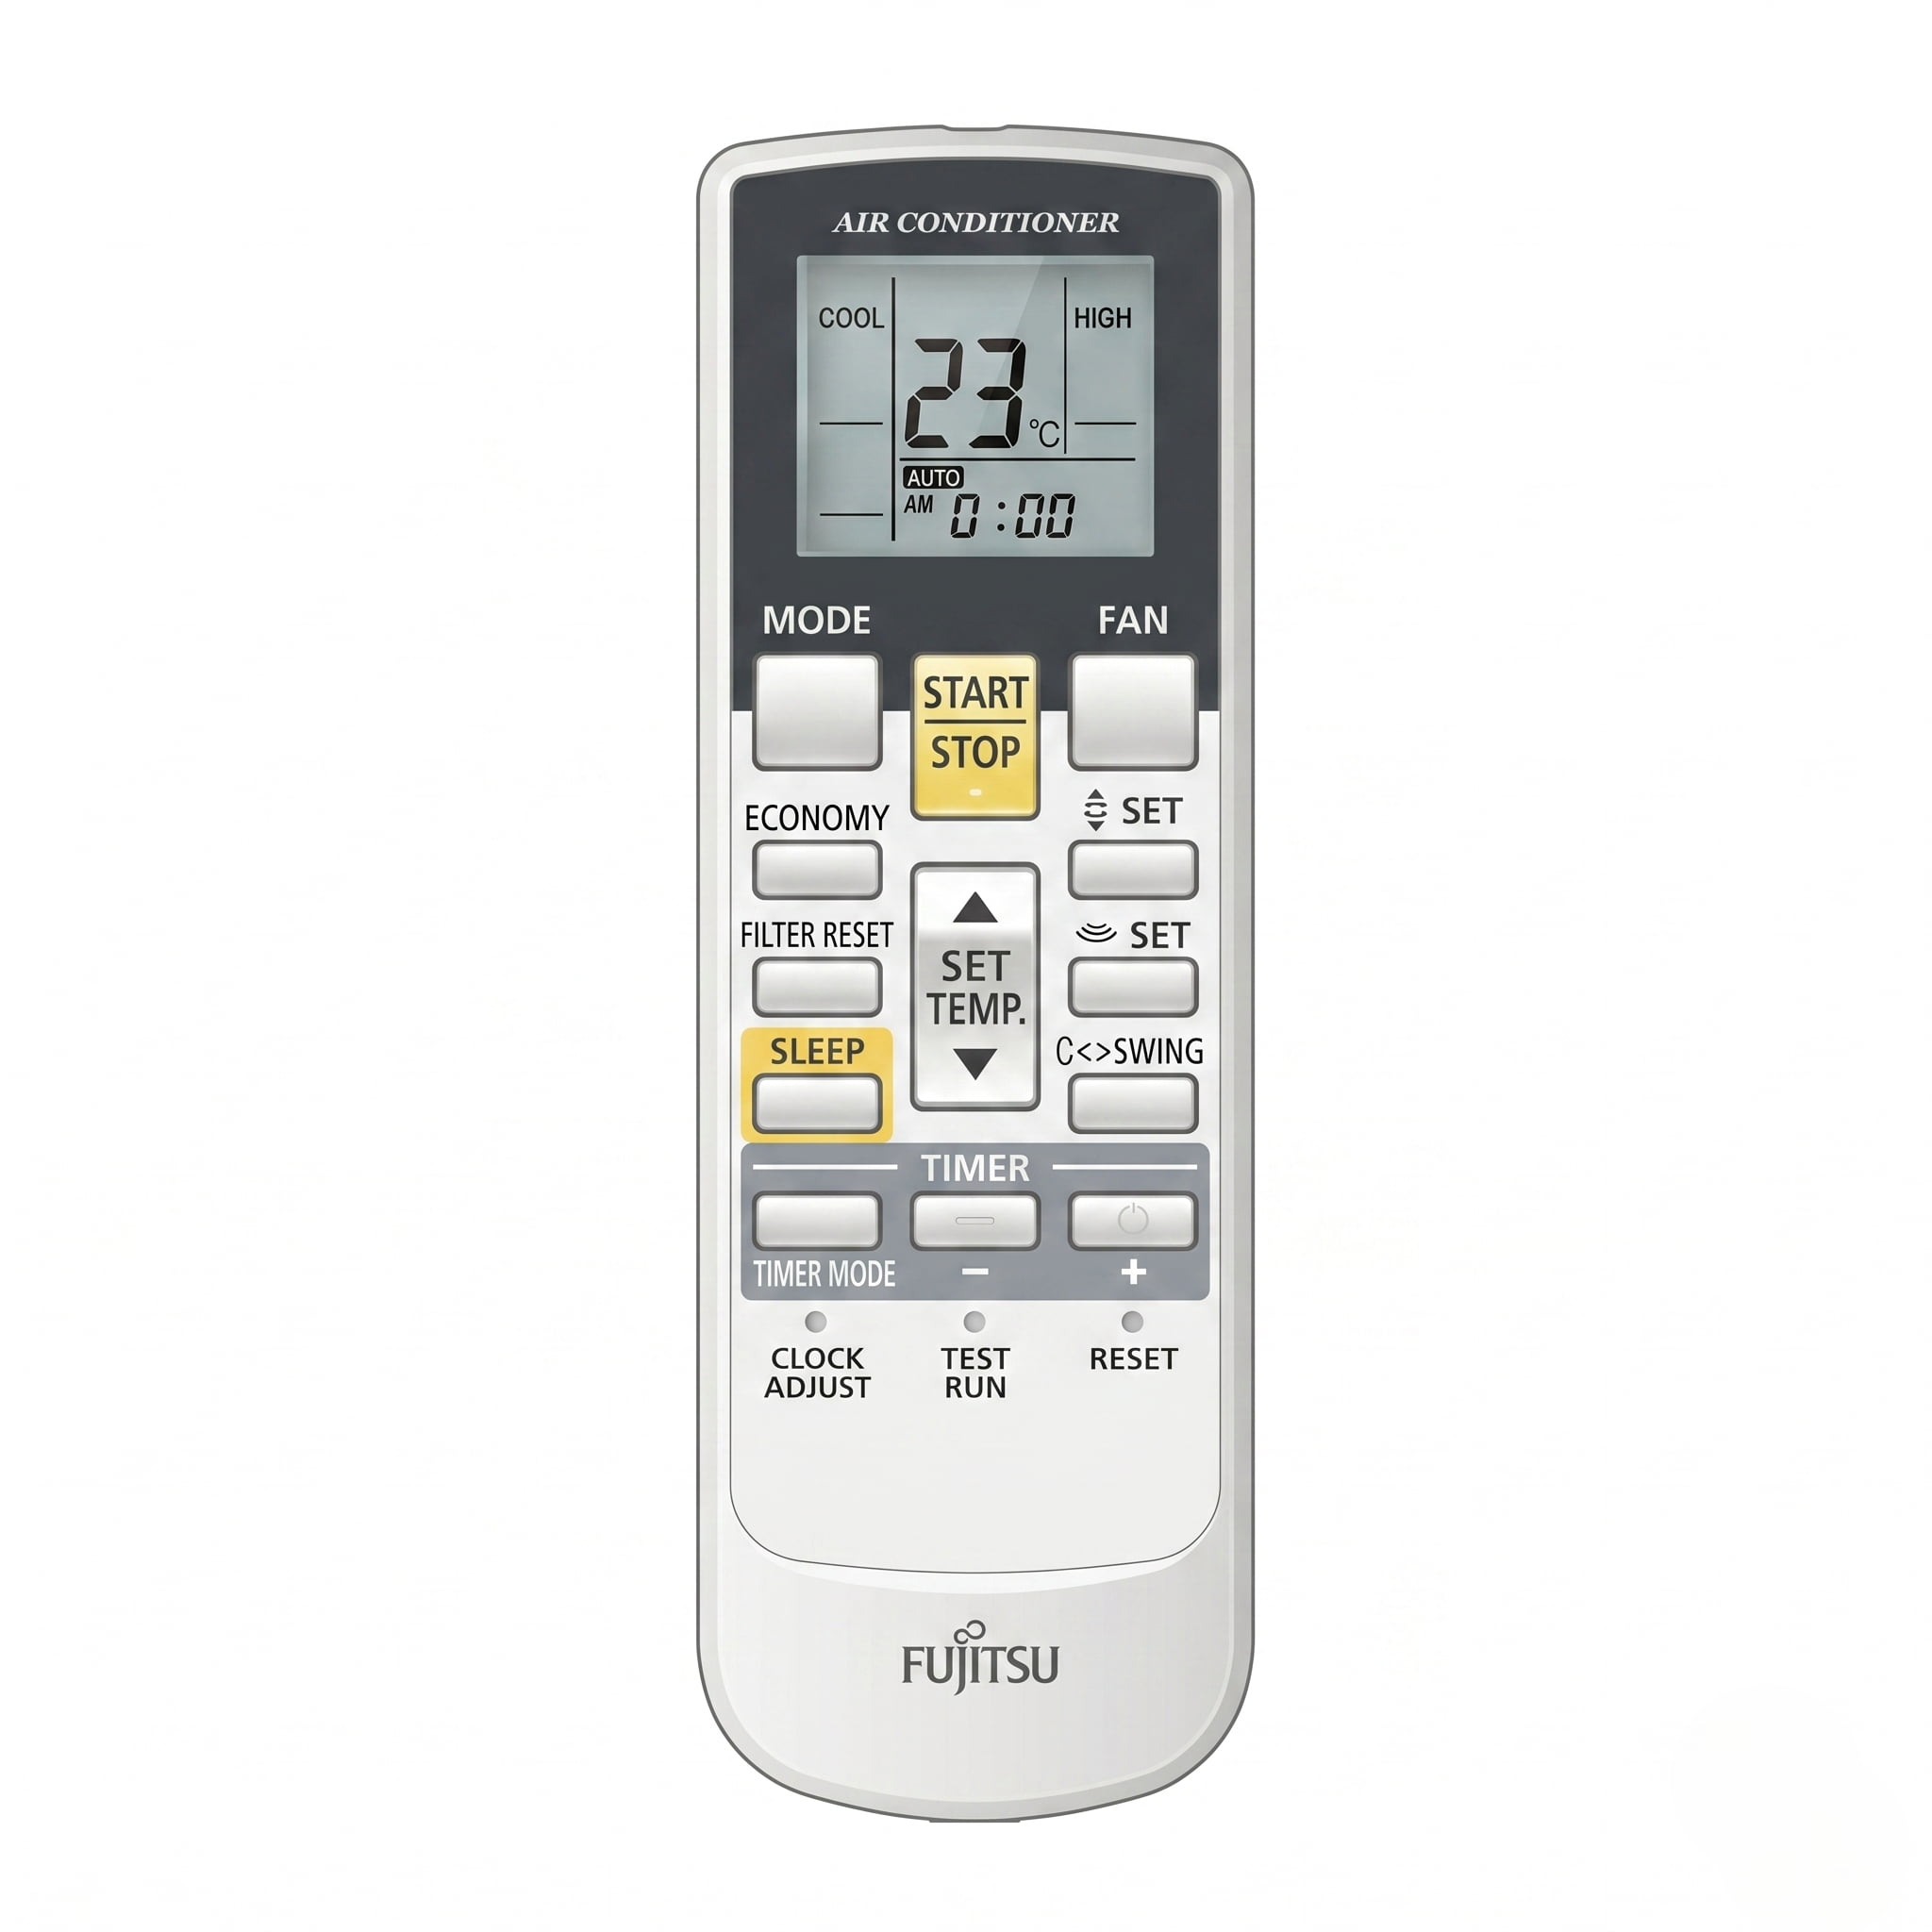
If your Fujitsu heat pump or air conditioner remote has a button, symbol, or flashing light you do not recognise, this guide covers it. Every mode, every Fujitsu-specific function, and what to do when the unit behaves in a way you did not expect.
This guide covers the current Fujitsu ASTG weekly timer remote, identified by its digital navigation buttons (SELECT, NEXT, BACK, SEND) and seven-day scheduling system. If your remote has a TIMER MODE button with plus and minus adjustment buttons instead, you have the older Simple Timer remote used on the ASTG-LVCC series and earlier models. The mode symbols and Economy mode sections of this guide apply to both remotes. The timer programming steps and filter reset instructions differ between the two, so check your specific manual for those steps.
For a full cross-brand comparison covering all major heat pump brands sold in NZ, see the heat pump remote symbols NZ guide.
Yes. A heat pump is a type of air conditioner that can also run in reverse to heat a room, and in New Zealand the two names are used for the same unit. Everything on this page about symbols, modes, and remote settings applies whether you call your Fujitsu system a heat pump or an air conditioner.
Fujitsu uses plain text labels for its main modes rather than icons. Where other brands show a sun for heat or a snowflake for cool, the Fujitsu display reads HEAT, COOL, DRY, FAN, or AUTO. The remote still uses symbols for other functions, and a few of Fujitsu's specific behaviours are different enough from other brands to be worth knowing before something surprises you.
One key difference: Fujitsu has a recessed RESET button on the front face of the remote, under the slide-down cover panel. After replacing the batteries, the remote will not function correctly until you press that button with the tip of a ballpoint pen. It is a step that is easy to skip. If the remote is still behaving strangely after a battery change, this is almost always why.
A note on branding: Fujitsu General New Zealand changed its trading name to GENERAL in 2026, with the product range now marketed as Airstage. The company, warranty terms, and support are unchanged. If you are finding GENERAL or Airstage branding where you expected Fujitsu, your unit is the same product.
The MODE button cycles through the available modes in a fixed order: AUTO, COOL, DRY, FAN, HEAT. Each press moves to the next mode in the sequence.
HEAT — Runs the system in heating mode. The display shows the target temperature you set. Use this mode through winter rather than leaving the unit on AUTO.
COOL — Runs the system in cooling mode. Sets a temperature ceiling the unit works to maintain.
AUTO — The unit selects heating or cooling automatically based on room temperature and your set point. AUTO mode can produce unexpected results in NZ conditions, particularly in spring and autumn when outdoor temperatures shift mid-day. If the room warms naturally above your set point, the unit switches to cooling. Locking the mode manually to HEAT or COOL gives more predictable results.
DRY — Runs at low fan speed to remove moisture from the air. The fan speed cannot be adjusted manually in this mode. Dry mode produces a cooling side-effect, which makes it unsuitable for cold NZ winters. It will make the room colder, not just drier.
FAN — Circulates air without heating or cooling. The temperature display disappears from the remote screen in this mode because temperature cannot be adjusted.
The Fujitsu remote LCD shows a small triangle or signal wave icon that flashes briefly each time a command is sent. Point the remote directly at the unit when you change any setting. If you change a setting while pointing away from the unit, the remote screen updates but the unit does not. The two then show different information, which you might read as the unit being faulty.
Other display indicators:
SWING — Appears when the automatic louver sweep is active.
LOW NOISE — Appears when the outdoor unit low noise function is running. This button is present on current weekly timer remotes only.
ENERGY SAVING — Appears when the Human Sensor is active and monitoring the room. This function is present on current weekly timer remotes only.
WEEKLY / ON / OFF / SLEEP — Text indicators showing which timer functions are currently engaged.
The clock display shows AM/PM time alongside abbreviated day labels: MO, TU, WE, TH, FR, SA, SU.
The ECONOMY button reduces power consumption by automatically shifting the thermostat baseline. In cooling mode, the unit runs the room slightly warmer than your set temperature. In heating mode, slightly cooler. It does not simply cap compressor output the way some other brands do.
On very cold or very hot days, Economy mode may mean the room does not reach your set temperature at all. If you notice the unit running continuously without reaching the temperature displayed, turn Economy off to allow the compressor to run at full output. Leaving Economy on during mild weather is fine and will reduce running costs.
Economy mode is available on both current and older Fujitsu wireless remotes.
The POWERFUL button does the opposite. It runs the system at maximum capacity and maximum airflow to reach your set temperature as quickly as possible. Use it when you come home to a cold room in winter or a hot room in summer, then switch back to normal operation once the room reaches temperature. Running POWERFUL continuously is not efficient and is not what it is designed for.
If your Fujitsu heat pump lights are flashing — whether it is the ECONOMY lamp alone, the OPERATION lamp, or all three lamps together — see the dedicated Fujitsu heat pump flashing lights guide for exactly what each pattern means and what to do about it.
The unit automatically resets the vertical louver from positions 4 through 7 back to position 3 after approximately 30 minutes during cooling or dry mode. This is not a malfunction. At those lower angles, condensation forms on the louver surface and drips. The unit corrects the position to prevent water damage to furniture below.
Do not adjust the vertical louvers by hand. They are motorised, and manual adjustment breaks or desynchronises the gears. Use the SET button on the remote to move them.
Horizontal airflow is different. On several ASTG models, the horizontal louvers are adjusted manually using two knobs on the unit. Before adjusting them, make sure the vertical louver has stopped moving completely. Adjust the knobs by hand to direct airflow left or right once the vertical louver is at rest.
The SENSOR button activates the Human Sensor function, shown on the display as ENERGY SAVING. This feature is available on current ASTG weekly timer remotes. It is not present on older Simple Timer remotes.
The sensor monitors the room for movement using an infrared thermal detector. When no movement is detected for a period of time, it automatically reduces operating power and shifts the set temperature. When someone returns, it reverts to the original settings.
If the room is only occupied part of the day, leave the Human Sensor on. If the unit is outputting less heat or running below the level you set when you return to a room, the Human Sensor is likely the reason.
The 10°C HEAT button runs the system at just enough output to hold the room at 10°C. It is designed for unoccupied periods in winter: background warmth that keeps pipes from freezing and stops rooms from getting extremely cold before you return home. The 10°C HEAT function will not make a cold room comfortable. Use HEAT mode for that.
The Fujitsu ASTG series has built-in compatibility with electricity grid Demand Response programmes. If your electricity retailer has enrolled you in a DR scheme, they can send a signal to the unit. The unit then reduces its output or enters standby during peak grid load events.
This happens automatically and without any action from you. If your unit appears to stop heating or cooling properly during a peak period, check whether your retailer has an active DR event before assuming the unit is faulty.
If your remote has SELECT, NEXT, BACK, and SEND buttons, use these steps. This covers both a single one-off timer and the repeating weekly schedule.
Setting a single one-off ON or OFF timer
Press TIMER SETTING to start. WEEKLY blinks on the screen. Press SELECT to cycle through the options: WEEKLY, then ON, then OFF, then ON/OFF together, then SLEEP. Stop when ON or OFF is blinking, whichever you want to set, then press NEXT. The time digits start flashing. Press SELECT to set your desired time, in 5-minute steps, or hold the button down for 10-minute steps. Point the remote at the indoor unit and press SEND to finish. To cancel, press the ON/OFF timer button while the indicator is showing on the screen.
Setting the weekly timer
The weekly timer supports up to four programmes a day and 28 a week. Press TIMER SETTING, select WEEKLY, then press NEXT. Press SELECT to choose the day of the week and which programme number (1 to 4) you're setting, then press NEXT. Press SELECT to choose whether that programme turns the unit ON, OFF, or clears an existing programme, then press NEXT. Press SELECT to set the time, then press NEXT. If you selected ON, press SELECT again to set the target temperature, adjustable between 18.0°C and 30.0°C, then press NEXT. Repeat for any other programmes or days you want to set, then press SEND, pointed at the indoor unit, to transmit everything at once. That last step is the one people miss. Nothing saves to the unit until you press SEND, regardless of what the remote screen shows.
Setting the clock
Make sure no timers are currently running first, since an active timer locks out clock changes. Press the recessed CLOCK ADJUST button using the tip of a ballpoint pen. The day of the week starts blinking. Press SELECT to set the correct day, or use the TEMP buttons at this step if you want to switch between a 12-hour and 24-hour display. Press NEXT to lock in the day, then press SELECT to adjust the time, in 1-minute steps, or hold for 10-minute steps. Point the remote at the indoor unit and press SEND to finish and start the clock.
If your remote has a TIMER MODE button with separate plus and minus buttons instead, use these steps. This remote only supports a single one-off timer, not a repeating weekly schedule. Weekly scheduling on these units is only available through a wired wall controller, not the handheld remote.
Setting a single ON or OFF timer
If the unit is stopped, press START/STOP first. Press TIMER MODE to cycle through CANCEL, OFF, ON, and PROGRAM (a combined off-then-on or on-then-off setting). The orange TIMER lamp on the indoor unit lights up and the time digits flash on the remote. Use the up/down or plus/minus buttons to adjust the time. You need to make this adjustment while the display is flashing. It stops flashing 5 seconds after your last button press. Once it stops flashing, the setting transmits to the unit automatically. There's no separate send button on this remote. To cancel, press TIMER MODE and select CANCEL.
Setting the clock
Press the recessed CLOCK ADJUST button (labelled CLOCK on some models) using the tip of a ballpoint pen. The time digits start flashing. Use the up/down or plus/minus buttons to set the current time, in 1-minute steps, or hold for 10-minute steps. Press CLOCK ADJUST again to lock it in and start the clock.
The standard Fujitsu ASTG remote manuals do not contain any FGLair app setup instructions. Wifi connectivity on compatible models is handled through a separate wifi adapter module, not through the remote itself.
If your unit is wifi-compatible, the FGLair app connects via 2.4GHz wifi only. Five GHz networks are not supported for setup. The app gives you remote control, scheduling, and energy monitoring from your phone, which you may find more convenient than programming the timer on the remote.
For FGLair setup steps, the Fujitsu NZ website and the app itself provide current instructions. These are updated more frequently than printed manuals.
When the remote battery runs flat and you replace it, the remote will not function correctly until you press the RESET button. It is a recessed button on the front face of the remote, under the slide-down cover panel. Use the tip of a ballpoint pen to press it. For a full guide to remote troubleshooting and replacement options, see heat pump remote not working or lost.
The remote display will dim when batteries are low. This is often the first sign rather than the remote stopping completely.
If the remote is not sending commands after a battery change and you have already pressed RESET, check that the remote is pointed directly at the unit when you press buttons. The receiver on the indoor unit can be blocked by direct sunlight, flat-panel screens, or certain fluorescent lights, including inverter-type fluorescent fittings.
Fujitsu's documentation states directly: "If dirt is allowed to accumulate on the air filter, air flow will be reduced, lowering operating efficiency and increasing noise." The same documentation notes that extended use without maintenance allows dirt to accumulate inside the unit, reducing performance in ways filter cleaning cannot address.
To clean standard Fujitsu mesh filters: open the front panel and slide the filters out. Vacuum off loose dust first, then rinse under lukewarm water from the clean side through to the dirty side. If heavily soiled, wash gently with mild detergent and rinse thoroughly. Shake off excess water and dry completely in shade before reinstalling. Never refit a damp filter. For a complete step-by-step guide, see how to clean your heat pump filter.
The ASTG operation manual recommends cleaning filters every two weeks during regular use. Clean more frequently if you have pets, high dust levels, or notice reduced performance.
Some higher-specification Fujitsu models also include an advanced ionisation filter. This filter requires periodic replacement, not just cleaning. A standard filter clean will not restore a degraded ionisation filter to full function. If your unit has this feature, the filter condition should be assessed as part of any professional service visit.
Fujitsu's own documentation is specific: "When used for extended periods, the unit may accumulate dirt inside, reducing its performance." Filter cleaning handles what you can reach. The internal fan accumulates a layer of organic growth during cooling cycles. The internal coil collects debris that restricts airflow and forces the compressor to work harder than it should. Both are inaccessible without removing panels and using specialist cleaning equipment. GENERAL recommends a heat pump professional service every twelve months. A professional service cleans the components the filter cannot reach, checks refrigerant levels, inspects the drain system, and checks that the unit is running the way it should.
For a full breakdown of what a Fujitsu service involves, including what the warranty actually covers, see the Fujitsu heat pump service NZ guide.
After replacing batteries, you must press the recessed RESET button on the front face of the remote, under the slide-down cover panel, using the tip of a ballpoint pen. Without this step, the remote will not function correctly. If it is still not responding after pressing RESET, check that you are pointing the remote directly at the unit when pressing buttons.
ENERGY SAVING indicates the Human Sensor is active. This feature is available on current ASTG weekly timer remotes. The sensor monitors the room for movement and when no movement is detected for a period of time, the unit reduces its output automatically. It returns to normal settings when someone comes back into the room.
If the vertical louver is in a downward position (4 through 7) during cooling or dry mode, the unit automatically moves it back to position 3 after approximately 30 minutes. This prevents condensation from forming on the louver surface and dripping onto furniture. It is a built-in protection, not a fault.
It holds the room at 10°C when the house is unoccupied in winter. It is a frost and cold protection function designed to prevent rooms from getting extremely cold during extended absences. It will not make a cold room comfortable. Use HEAT mode for that.
TEST RUN is a function for use by authorised service technicians only. On older Simple Timer remotes it appears as a recessed button on the remote face. On current weekly timer remotes it is not present on the wireless remote. If activated accidentally, it runs a diagnostic mode that ignores thermostat settings. Switch the unit off at the wall and back on to exit.
No. Fan speed is set automatically when DRY mode is selected and cannot be manually adjusted. The system manages the fan speed to handle humidity removal. If you want to control fan speed, switch to a different operating mode.
WEEKLY indicates the weekly timer programme is active on current ASTG remotes. The display also shows abbreviated day labels and programme numbers. Up to four programmes per day can be set across the full week. Press SEND after programming to transmit the schedule to the unit. Without pressing SEND, the settings are not saved.
Fujitsu ASTG units have built-in compatibility with electricity retailer Demand Response programmes. If your retailer activates a DR event, the unit may automatically reduce its output or enter standby. This is controlled by the retailer, not by your remote. If your unit stops heating or cooling properly during a peak period, check whether your retailer has a DR event active before assuming a fault.
The exact button combination varies by model. Check the button combination section of your specific Fujitsu remote manual for the correct method. Do not use a combination described for another brand as the steps differ across manufacturers.
Some higher-specification Fujitsu models include an advanced ionisation filter for air purification. Unlike standard mesh filters, ionisation filters require periodic replacement rather than cleaning. If your model has this feature, the filter condition should be checked during a professional service visit.
Yes. Fujitsu General New Zealand changed its trading name to GENERAL in 2026, with the product range now marketed as Airstage. The company, warranty terms, and support team are unchanged. If you are finding GENERAL or Airstage branding where you expected Fujitsu, your unit and warranty are still fully supported.
If your remote has digital navigation buttons labelled SELECT, NEXT, BACK, and SEND, you have the current weekly timer remote used on ASTG-KUCA, ASTG-LUCB, and ASTG-KMTC series units. If your remote has a TIMER MODE button with plus and minus adjustment buttons, you have the older Simple Timer remote used on the ASTG-LVCC series and earlier models. The mode symbols and Economy mode work the same on both. Timer programming and filter reset differ between the two.
The POWERFUL button runs the system at maximum capacity and maximum airflow to reach your set temperature as quickly as possible. Use it when you come home to a cold room in winter or a hot room in summer, then switch back to normal operation once the room reaches temperature. It is not designed to run continuously.
A thin mist during cooling or dry operation is normal. It happens when the cold air leaving the unit causes warm room air to condense briefly. It is not smoke and it is not a fault. If you see mist in heating mode, or if the mist is accompanied by an unusual smell or sound, that is worth investigating.