
Most HRV owners have never been shown how their system actually works. They know it runs in the ceiling, they know there's a controller on the wall, and beyond that it's been set and forgotten since installation. This article covers what the settings actually do, how to get the best out of the system through each season, and what to watch for when things aren't quite right.
One note before we start: in New Zealand, "HRV" gets used as a catch-all term for any positive pressure ventilation system. This article covers HRV brand systems only. If you're looking for information on professional care for your HRV system, the positive pressure ventilation service page covers what that involves.
Before adjusting any settings, it helps to know which generation of controller is on your wall. HRV has produced four distinct types over the years, and the button sequences and displays work differently on each one.
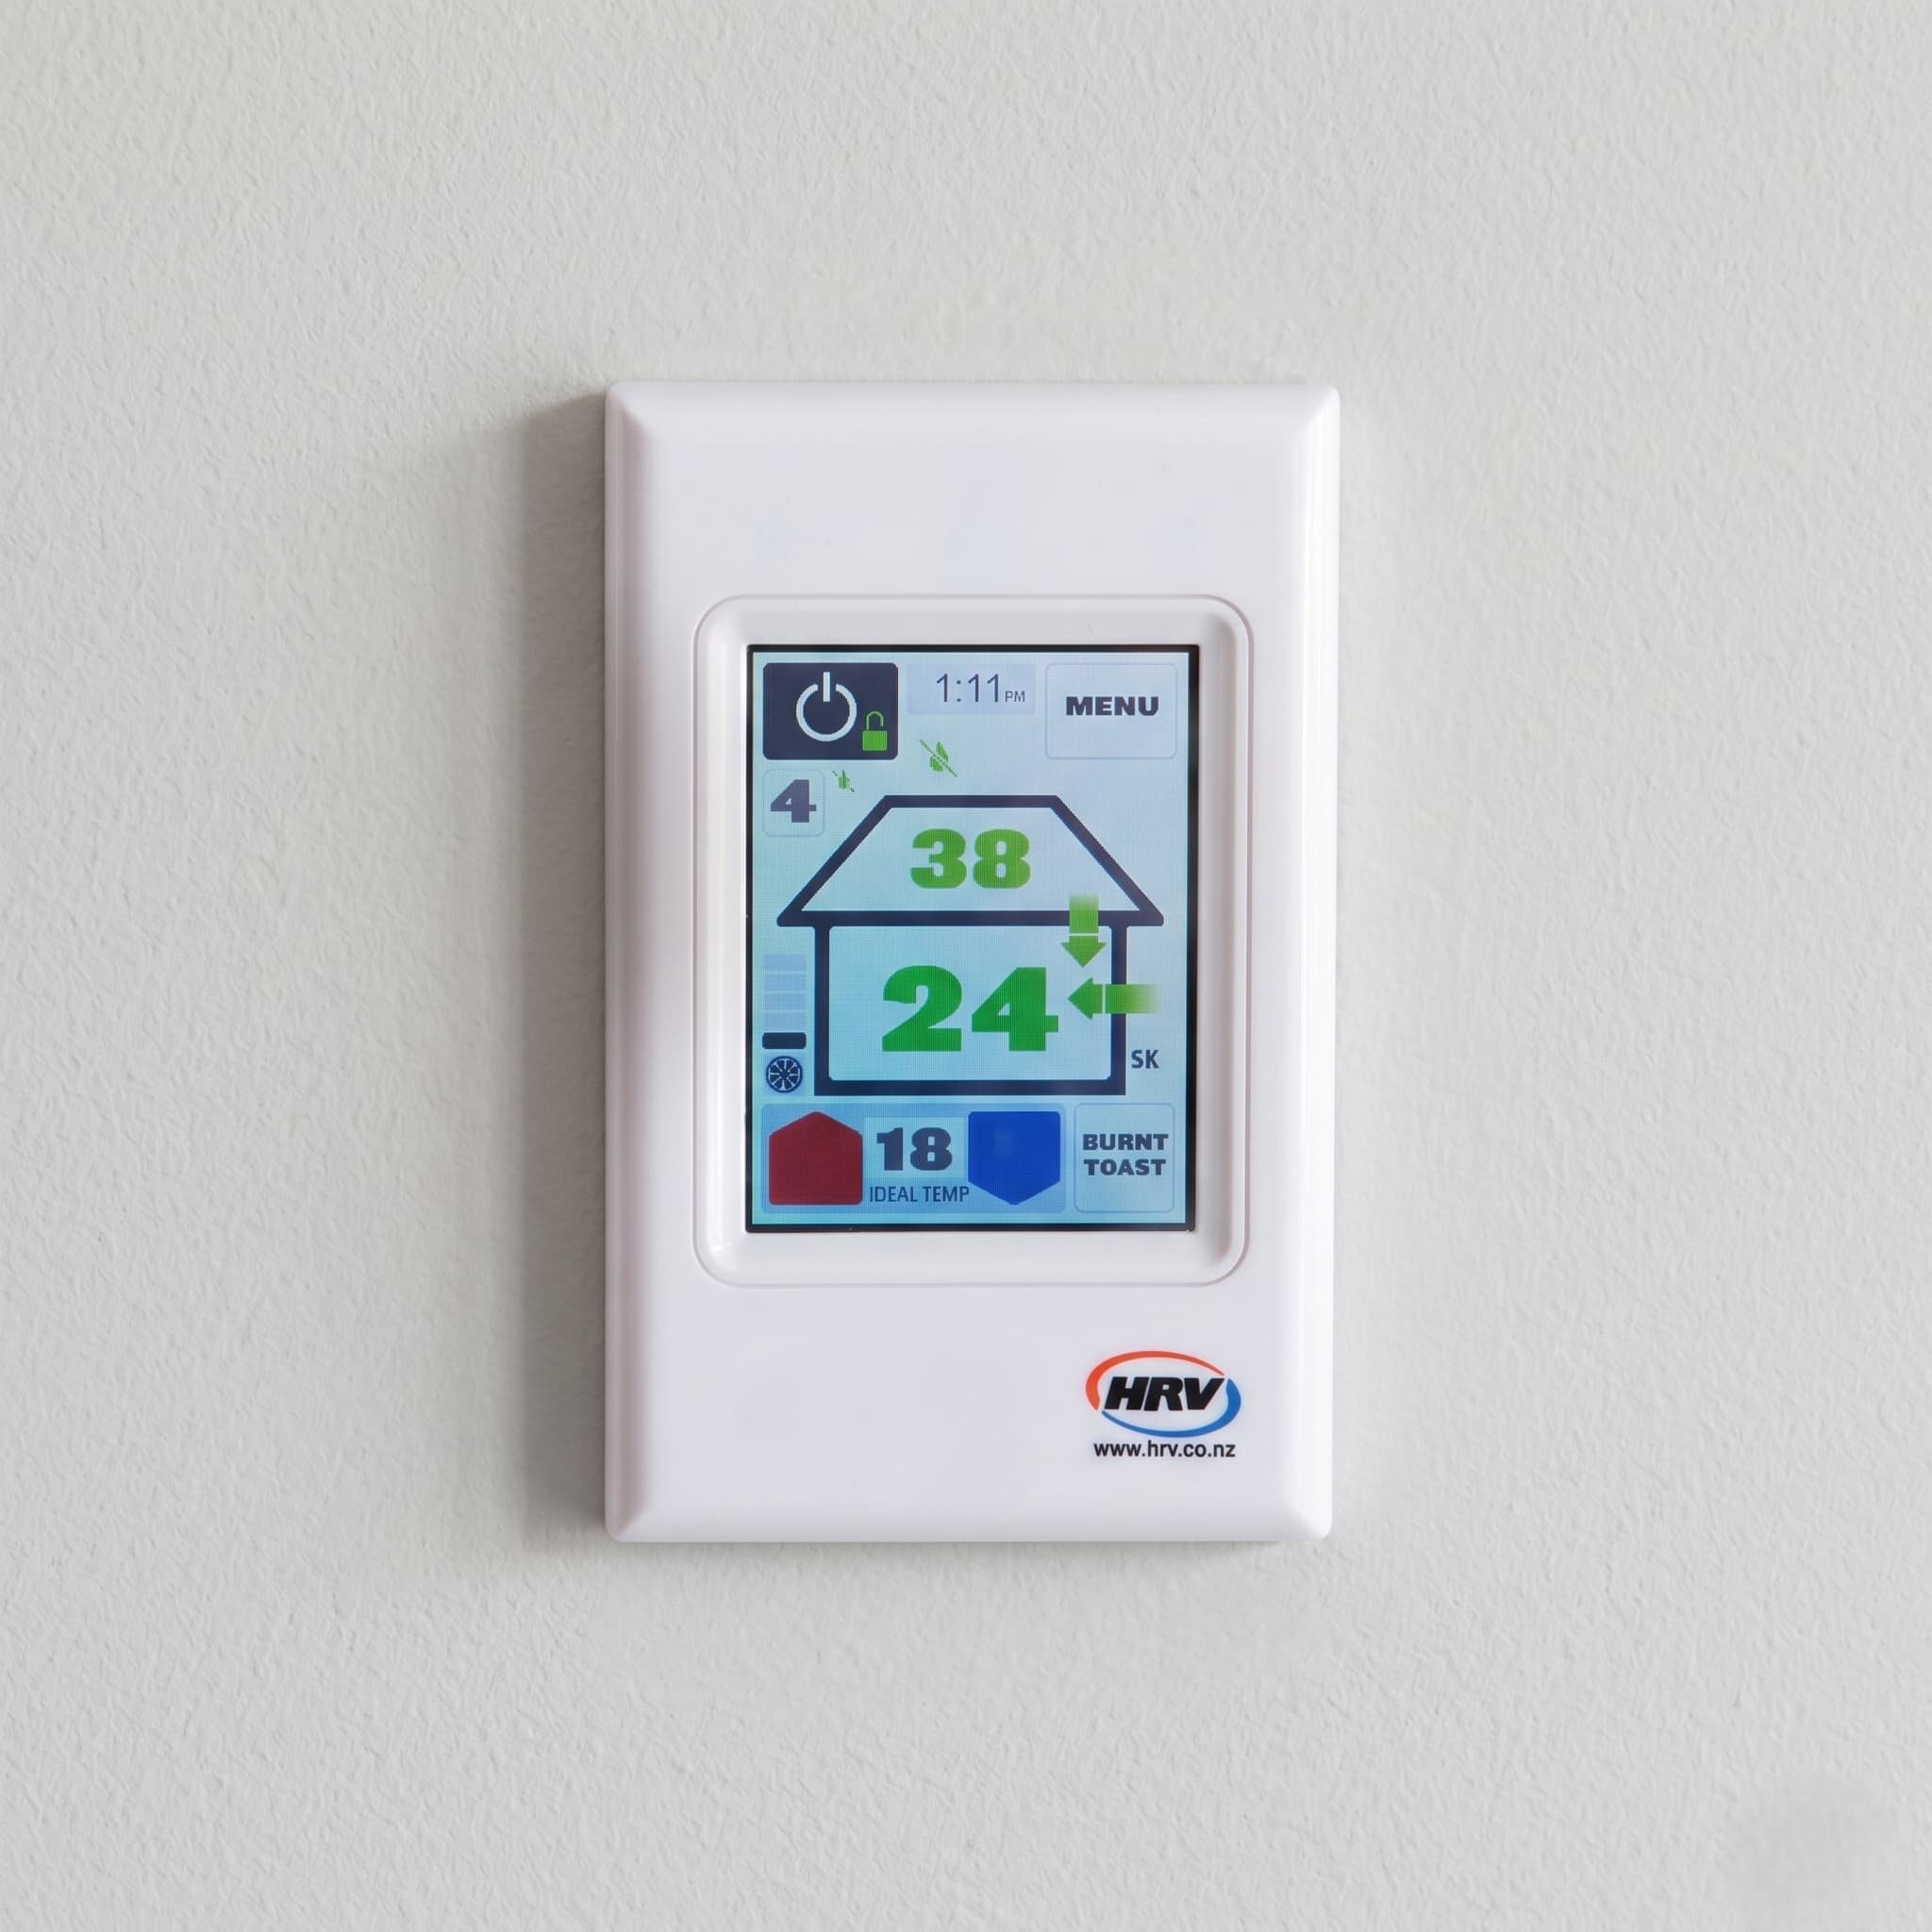
Colour touchscreen (AirSense or Classic)A square, flat panel with a full colour screen. No physical buttons. Shows a house graphic with arrows, roof temperature, house temperature, and a set temperature. The arrows and numbers change colour depending on which mode the system is in. If your controller looks like a small tablet mounted on the wall, this is the one you have.
Backlit LCD with touch keypad (AirSense Lite, Classic Lite, or HRV Lite)A white rectangular unit with a backlit numeric screen and touch-sensitive buttons below it. Shows temperature numbers and mode icons but no colour house graphic. Has a SET TEMP button and Up/Down arrows. If your controller has a pale backlit screen with icons and touch buttons, this is likely the one you have.
Older LCD with physical buttons (LCD controller, installed roughly 2005 to 2015)A white rectangular unit with three stacked two-digit numeric displays and physical Up/Down arrow buttons plus a FUNC button. The right side of the display has printed symbols that illuminate to show the current mode. If your controller has three rows of numbers and physical clickable buttons, this is the one you have.
Oldest LED controller (installed roughly pre-2008)A white rectangular unit with no numeric temperature screen. Instead, has a printed temperature scale on the left side with a red LED that moves to indicate the set temperature. Has three physical buttons labelled TEMP, ON/OFF, and FUNC. Physical heating and cooling indicator lights sit above the display. If your controller has a printed scale rather than a numeric screen and only three buttons, this is the one you have.
All four types run the same underlying system logic. The settings described in this article apply to all of them. The button sequences to access those settings are different on each one, and those differences are noted throughout.
The set temperature tells the system which mode to activate, not what temperature the house will reach.
Here's how it works in practice. Say you've set the controller to 20°C and the roof cavity temperature is sitting at 30°C on a warm winter afternoon. The system reads that the cavity is warmer than the set point, switches to heating mode, and ramps the fan to full speed to push that warmer air into the house to try to reach the target. The heating indicator shows on the controller. On the other side of the day, if the cavity drops to 14°C overnight and the set point is 20°C, the system reads the cavity as too cool to help and drops into background ventilation mode, running at the baseline fan level rather than pushing cold air in aggressively.
A cooling example works the same way in reverse. Set the controller to 18°C in summer and the roof cavity is at 24°C mid-morning. The system sees the cavity as warmer than the house and won't enter cooling mode. Once the cavity cools below the house temperature in the evening, the cooling indicator appears and the fan ramps to full speed to draw that cooler air in.
The system can only work with what's in the roof cavity. It can't produce warmth or coolness that isn't there. The set temperature is a trigger, not a thermostat.
One thing worth knowing about Auckland roof cavities: on a sunny winter day, a tin or iron roof heats the cavity quickly and can reach 22°C or above by mid-afternoon. That same cavity will cool down rapidly once the sun goes down. A concrete tile roof takes longer to heat the cavity to a useful temperature, but holds that warmth longer into the evening. Knowing your roof type helps explain why the system behaves differently at different times of day.
On overcast winter days when the roof cavity stays cool and can't help reach the target temperature, the system runs in background ventilation mode. At a high fan level the system introduces a significant volume of that cool air into the house.
Your HRV controller has two separate settings and they do completely different jobs. Understanding this makes every other setting decision straightforward.
The temperature setting is the set-and-forget control. Set it once and the system manages itself automatically from that point. When the roof cavity air can bring the house closer to the target temperature, the fan ramps to full speed and the heating or cooling indicator shows. When it can't, the system drops into background ventilation mode and waits for conditions to change. Once the desired temperature is selected, the system functions automatically all year round.
The fan level is the seasonal adjustment. It controls how much air moves when the system is in background ventilation mode and the temperature logic isn't actively driving the fan. Think of it as the floor, not the ceiling. When the system is actively chasing the temperature target, the fan runs at full speed regardless of what level is set. When it's not, the fan runs at whatever level has been chosen.
This is the setting that needs adjusting twice a year: lower in spring, summer, and autumn, higher in winter. The reason is condensation control. At different times of year, more or less air is needed to clear moisture from the home. The fan level is how you dial that in for the specific house and season.
What you see on the controller depends on which generation you have.
Colour touchscreen (AirSense or Classic)The controller shows a house graphic with arrows and coloured numbers. When the system is in heating mode, the arrows and temperature numbers turn red. When cooling, they turn blue. When the system is in background ventilation mode, everything turns green. The current ventilation level number is visible on the main screen at all times.
Backlit LCD with touch keypad (Lite models)The controller shows specific on-screen icons to indicate heating, cooling, or ventilation mode. There is no colour house graphic. The ventilation level is not visible on the main screen during normal operation.
Older LCD controller (three stacked displays)The right side of the display has printed symbols that illuminate to show which mode is active. A bar graph of up to five segments shows an approximation of the current fan speed.
Oldest LED controller (TEMP, ON/OFF, FUNC buttons)There is no numeric screen for mode indication. A physical heating indicator light and a separate cooling indicator light sit above the display. When the system is actively heating or cooling toward the temperature target, the relevant light illuminates. When both lights are off, the system is in background ventilation mode. The set temperature is not shown as a number. Instead, a red LED moves along a printed temperature scale on the left side of the unit to indicate the current target.
On all models the underlying logic is the same: when the roof cavity air can help reach the temperature target, the system runs at full speed in heating or cooling mode. When it can't, it drops to background ventilation at whatever fan level is set.
Set the temperature target to whatever feels comfortable for the home, then leave it. The system handles the rest automatically.
The fan level needs a one-time calibration at the start of winter. HRV's recommended range is levels 3 to 6. Start at level 6 and drop by one level every few days. When window condensation appears on surfaces where it wasn't before, raise back one level. That's the right level for that home this winter. Leave it there until spring.
Here's the part that surprises most people: a modern well-sealed home with double glazing typically needs a higher fan level than an older villa. In a tightly sealed home, moisture from cooking, showering, and breathing has nowhere to go naturally. The ventilation system has to work harder to control it. An older home with natural gaps around windows and doors exchanges air more freely, so the system doesn't need to run as hard to keep moisture in check.
How to adjust the fan level by controller type:
Colour touchscreen: The current level is visible on the main screen. Adjust using the on-screen Up and Down arrows.
Backlit LCD Lite models: Turn the system off. Hold the Down arrow for 3 seconds until the display lights up. Use the Power button to cycle through levels 1 to 6. Press Func to exit.
Older LCD controller: Use the Up and Down arrow buttons to adjust directly.
Oldest LED controller: Turn the system off using the ON/OFF button to enter setting mode, then adjust the level.
Set the temperature target to 18°C. This is the setting the system was designed for in summer operation. When the roof cavity cools below the house temperature overnight, the fan ramps automatically to full speed and works to bring the house down toward 18°C. On some models this operates as a named Cooling Mode that holds the target for four hours. On others it's simply how the temperature logic works by default. Either way, the system manages itself once the target is set.
Drop the fan level to 1. During the hours when the roof cavity is too hot to help reach 18°C, the system falls into background ventilation mode and runs at whatever level is set. At level 1 it's moving minimal air. This prevents the system from pushing hot roof air into the home during the day while it waits for conditions to change. Leaving the level too high in summer will make the home warmer during the day.
The primary overnight function in summer is CO2 control, not moisture. During sleeping hours, CO2 levels in a closed home rise steadily. Running the system at a low level overnight keeps air fresh without needing windows open.
The one manual step is the evening flush before bed. Once the sun has gone down and outdoor temperatures have started to drop, open some windows or doors and run burnt toast mode for an hour. The hot air from the roof cavity is pushed through the system into the house and out through the open windows and doors. As that hot air clears, cooler outside air takes its place in the roof cavity. Once the cycle completes, close the windows and let the system take over. With the temperature set to 18°C and the fan at level 1, the system ramps up automatically when the cavity cools enough to help and drops back when it can't. The home stays comfortable, CO2 stays controlled overnight, and you don't need windows open for security or to keep insects out.
One important habit: after any manual fan adjustment in the evening, confirm the level is back at 1 before the following day. A level left higher will push a meaningful volume of hot roof air into the home the following afternoon.
Burnt toast mode forces the fan to 100% maximum speed for exactly one hour, regardless of temperature settings. The system ignores all its normal rules and moves as much air as possible.
How to activate it by controller type:
Colour touchscreen: Press the dedicated Burnt Toast button on the main screen, or find it through the submenus.
Backlit LCD Lite models: Hold the Down arrow button for 3 seconds.
Older LCD controller: Hold the Down arrow button for 3 seconds.
Oldest LED controller: Hold the TEMP button for 3 seconds.
Three situations where it earns its place:
Sudden odours: Burnt toast, paint fumes, anything airborne you want cleared quickly. One activation, one hour.
Heavy window condensation that's not clearing: If multiple windows are badly affected first thing in the morning, one burnt toast cycle will clear it faster than running the fan at maximum level all morning.
Flushing summer roof heat in the evening: Run it after sunset with windows open, then close up and let the system manage overnight with the temperature set to 18°C and the fan at level 1.
One thing to avoid: don't run burnt toast mode during heavy rain or high outdoor humidity. At 100% fan speed a large volume of damp outside air comes through the system quickly. In wet Auckland weather that can work against you.
In a larger open-plan home you may find the airflow doesn't feel especially strong at 100%, which limits how effective it is for odour clearing across the whole space. It's still the right tool for the job. It just won't feel as dramatic as the name suggests.
When you switch the system off manually, it's programmed to turn itself back on after 8 hours. This isn't a fault. It's by design.
The system is built to run continuously. A dry home is cheaper to heat than a damp one, and in winter overnight is exactly when moisture builds fastest. The auto-restart prevents the situation where someone switches the system off because they're cold and wakes to condensation because airflow stopped during the night.
If the house is cold because of the system, the answer isn't switching it off. It's dropping the fan level and confirming the temperature target is set appropriately. That reduces the volume of cool air coming through without stopping the moisture control function.
Some HRV controllers also have a dedicated winter setting, separate from the fan level, that limits the minimum temperature of air the system will introduce. Check your specific model's manual to confirm whether this feature is available. If your system has it, enabling it in winter works alongside the fan level calibration rather than replacing it.
There's no way to permanently disable the 8-hour restart through normal controller operation.
Not every HRV installation in Auckland includes an ATU. Check the controller for an ATU symbol or indicator to confirm whether yours does.
If it's there, you have an optional inline electric heater fitted to the ducting. It takes the chill off incoming air before it reaches the ceiling diffusers. Used correctly it's the most effective way to manage winter cold air from the system.
How the ATU is controlled depends on the controller generation.
Colour touchscreen: The ATU has a dedicated icon on the main screen and is managed through the advanced menu options.
Older LCD controller: The FUNC button toggles between two modes. Press once for Air Tempering Mode, the correct everyday setting that takes the chill off incoming air with low power draw. Hold for 3 seconds for Thermostat Mode, which runs the heater whenever the house drops below the set temperature. Thermostat Mode is significantly more expensive to run and isn't recommended for everyday use unless the running cost has been specifically budgeted for.
Oldest LED controller: On LED models fitted with an ATU, the FUNC button simply enables or disables the heater entirely. It does not toggle between Air Tempering and Thermostat modes as it does on the LCD controller.
If you've been running the ATU in Thermostat Mode without realising it, switching to Air Tempering Mode is likely to reduce your running costs.
When the filter hasn't been changed, the first effect is restricted airflow. The internal fan works harder against the restriction. The system still appears to be running. Airflow from the ceiling diffusers reduces gradually. The first sign most owners notice is window condensation returning to surfaces where it wasn't before.
Left longer without a filter replacement, contaminated air can bypass the degraded filter and reach the fan housing behind it. If that continues while the system runs continuously, air quality in the home is affected rather than improved. The system installed to protect the indoor environment becomes the source of the problem. That's the Healthy Home Blindspot in its most direct form.
Changing the filter yourself is something many owners do, and MiHT doesn't discourage it. Compatible F8-grade replacement filters are available from Bunnings and local suppliers at a fraction of the brand's price. A DIY filter swap is better than no filter swap.
One important note if your system is still within its five-year HRV brand warranty: the warranty requires filter changes to be carried out by authorised HRV personnel using genuine filters. Using a third-party filter or provider during that period voids the warranty. After five years the manufacturer has no hold on maintenance choices. This article covers the full warranty detail for HRV systems.
What a filter swap doesn't cover is the rest of the system. A professional service inspects the fan housing behind the filter, the condition of the duct runs from the unit to each ceiling diffuser, the airflow rate at each outlet, and the overall condition of the unit. A written condition report documents the findings. If something is outside a serviceable condition, it's documented and referred.
A filter change and a housing inspection are not the same service. Most owners have had one but not the other.
MiHT is a maintenance-only provider. We don't sell or install systems, which means the recommendation you get is based solely on what the system needs. For the full scope of what a professional ventilation service covers, this article explains the complete process. To see what a MiHT ventilation care visit involves and what's included, visit the ventilation care page.
The reset process varies by controller type. On colour touchscreen models: go to Advanced options in the system submenus and select the new filter reset option. On older LCD controllers with three stacked displays: switch the unit off, hold the Down button for 8 seconds until "02" appears in the roof temperature display, press the Up button to increase the value to "22", then press the Power button to complete the reset. On Lite models and the oldest LED controllers, the exact reset sequence isn't fully documented in available HRV materials. If the filter indicator is flashing and the methods above don't apply to your controller, contact HRV directly or have a technician confirm the correct sequence for your specific model. Always reset after a physical filter change, not before.
The set temperature tells the system which mode to activate, not what temperature the house will reach. When the roof cavity is warmer than the set temperature, the heating indicator shows and the fan ramps to full speed to bring that warmer air in. When roof air is neither warm enough nor cool enough, the system drops to background ventilation mode and runs at the baseline fan level. The system can only work with what's in the roof cavity. It can't produce warmth or coolness that isn't there.
Turning it off increases moisture buildup and makes the home harder to heat. A damp home costs more to heat than a dry one. If the system is making the home too cold, the right adjustment is dropping the fan level and checking the temperature target, not switching it off. The system is also programmed to restart automatically after 8 hours because in winter overnight is the highest-moisture period.
The activation method depends on the controller. Colour touchscreen: press the dedicated Burnt Toast button. Lite and older LCD models: hold the Down arrow for 3 seconds. Oldest LED controller: hold the TEMP button for 3 seconds. In all cases the fan runs at 100% for one hour. Use it for sudden odours, to clear heavy window condensation, or in summer evenings to flush hot roof air before sleeping. Avoid running it during heavy rain or high outdoor humidity.
The fan motor itself draws modest power at around 40 watts. The more significant cost is indirect. Running a high fan level in winter on days when the roof cavity is cool means the heating system works longer to compensate. Turning the fan level down directly reduces that heating load.
On older LED controllers, both lights being off means the system is in background ventilation mode. The roof air is neither warm enough to trigger heating nor cool enough to trigger cooling. The system is still running at the baseline fan level. This is normal operation, not a fault.
No. Cold air in winter is the system operating normally. On overcast days the roof cavity is cool and the system draws from there. Dropping the fan level lowers the volume of cool air coming through. Checking whether the temperature target is set appropriately for the season will also help. This article on winter cold air from positive pressure ventilation covers the full mechanics.
By the way, completely separate from everything above: if you want to know where your home's energy systems actually stand, the Home Energy Health Assessment at assessment.miht.co.nz takes around three minutes.
That system in your ceiling has probably been running on whatever settings were put in at installation, in a way nobody ever explained to you. Now you know which controller you have, what the indicators mean, how to calibrate the fan level for the specific home, and how the temperature setting and fan level work together through each season. That's enough to get genuinely useful performance out of it from here on.