
Your MoistureMaster has a filter with a replacement interval. You probably know that already. What sits behind the filter, and whether anyone has looked at it since installation, is a different question.
If your system was installed in the 2000s and came with the house, there is likely no service record, no contact from the original installer, and no obvious person to call. The system runs, the ceiling vents push air, and that is usually where the knowledge ends. If your filter light has come on, you have noticed condensation returning, or you are not sure when the system was last touched, this is the plain explanation that should have come with it.
Your MoistureMaster is a positive pressure ventilation system. It draws air from the roof cavity, passes it through a filter, and pushes that filtered air into your living areas through ceiling diffusers. The pressure that builds inside the home displaces stale, moist air through natural gaps in the building around door frames, window edges, and other small openings.
Two jobs: moisture control and air replacement. The system reduces condensation on windows and walls by keeping drier air circulating. It does not heat or cool the home the way a heat pump does, and it does not exchange heat from outgoing air the way a balanced ventilation system does.
The system works best in older NZ homes that have some natural draughtiness. The positive pressure effect depends on air being able to escape. In a very tightly sealed modern home a different ventilation approach may suit better, which is something a service visit can confirm.
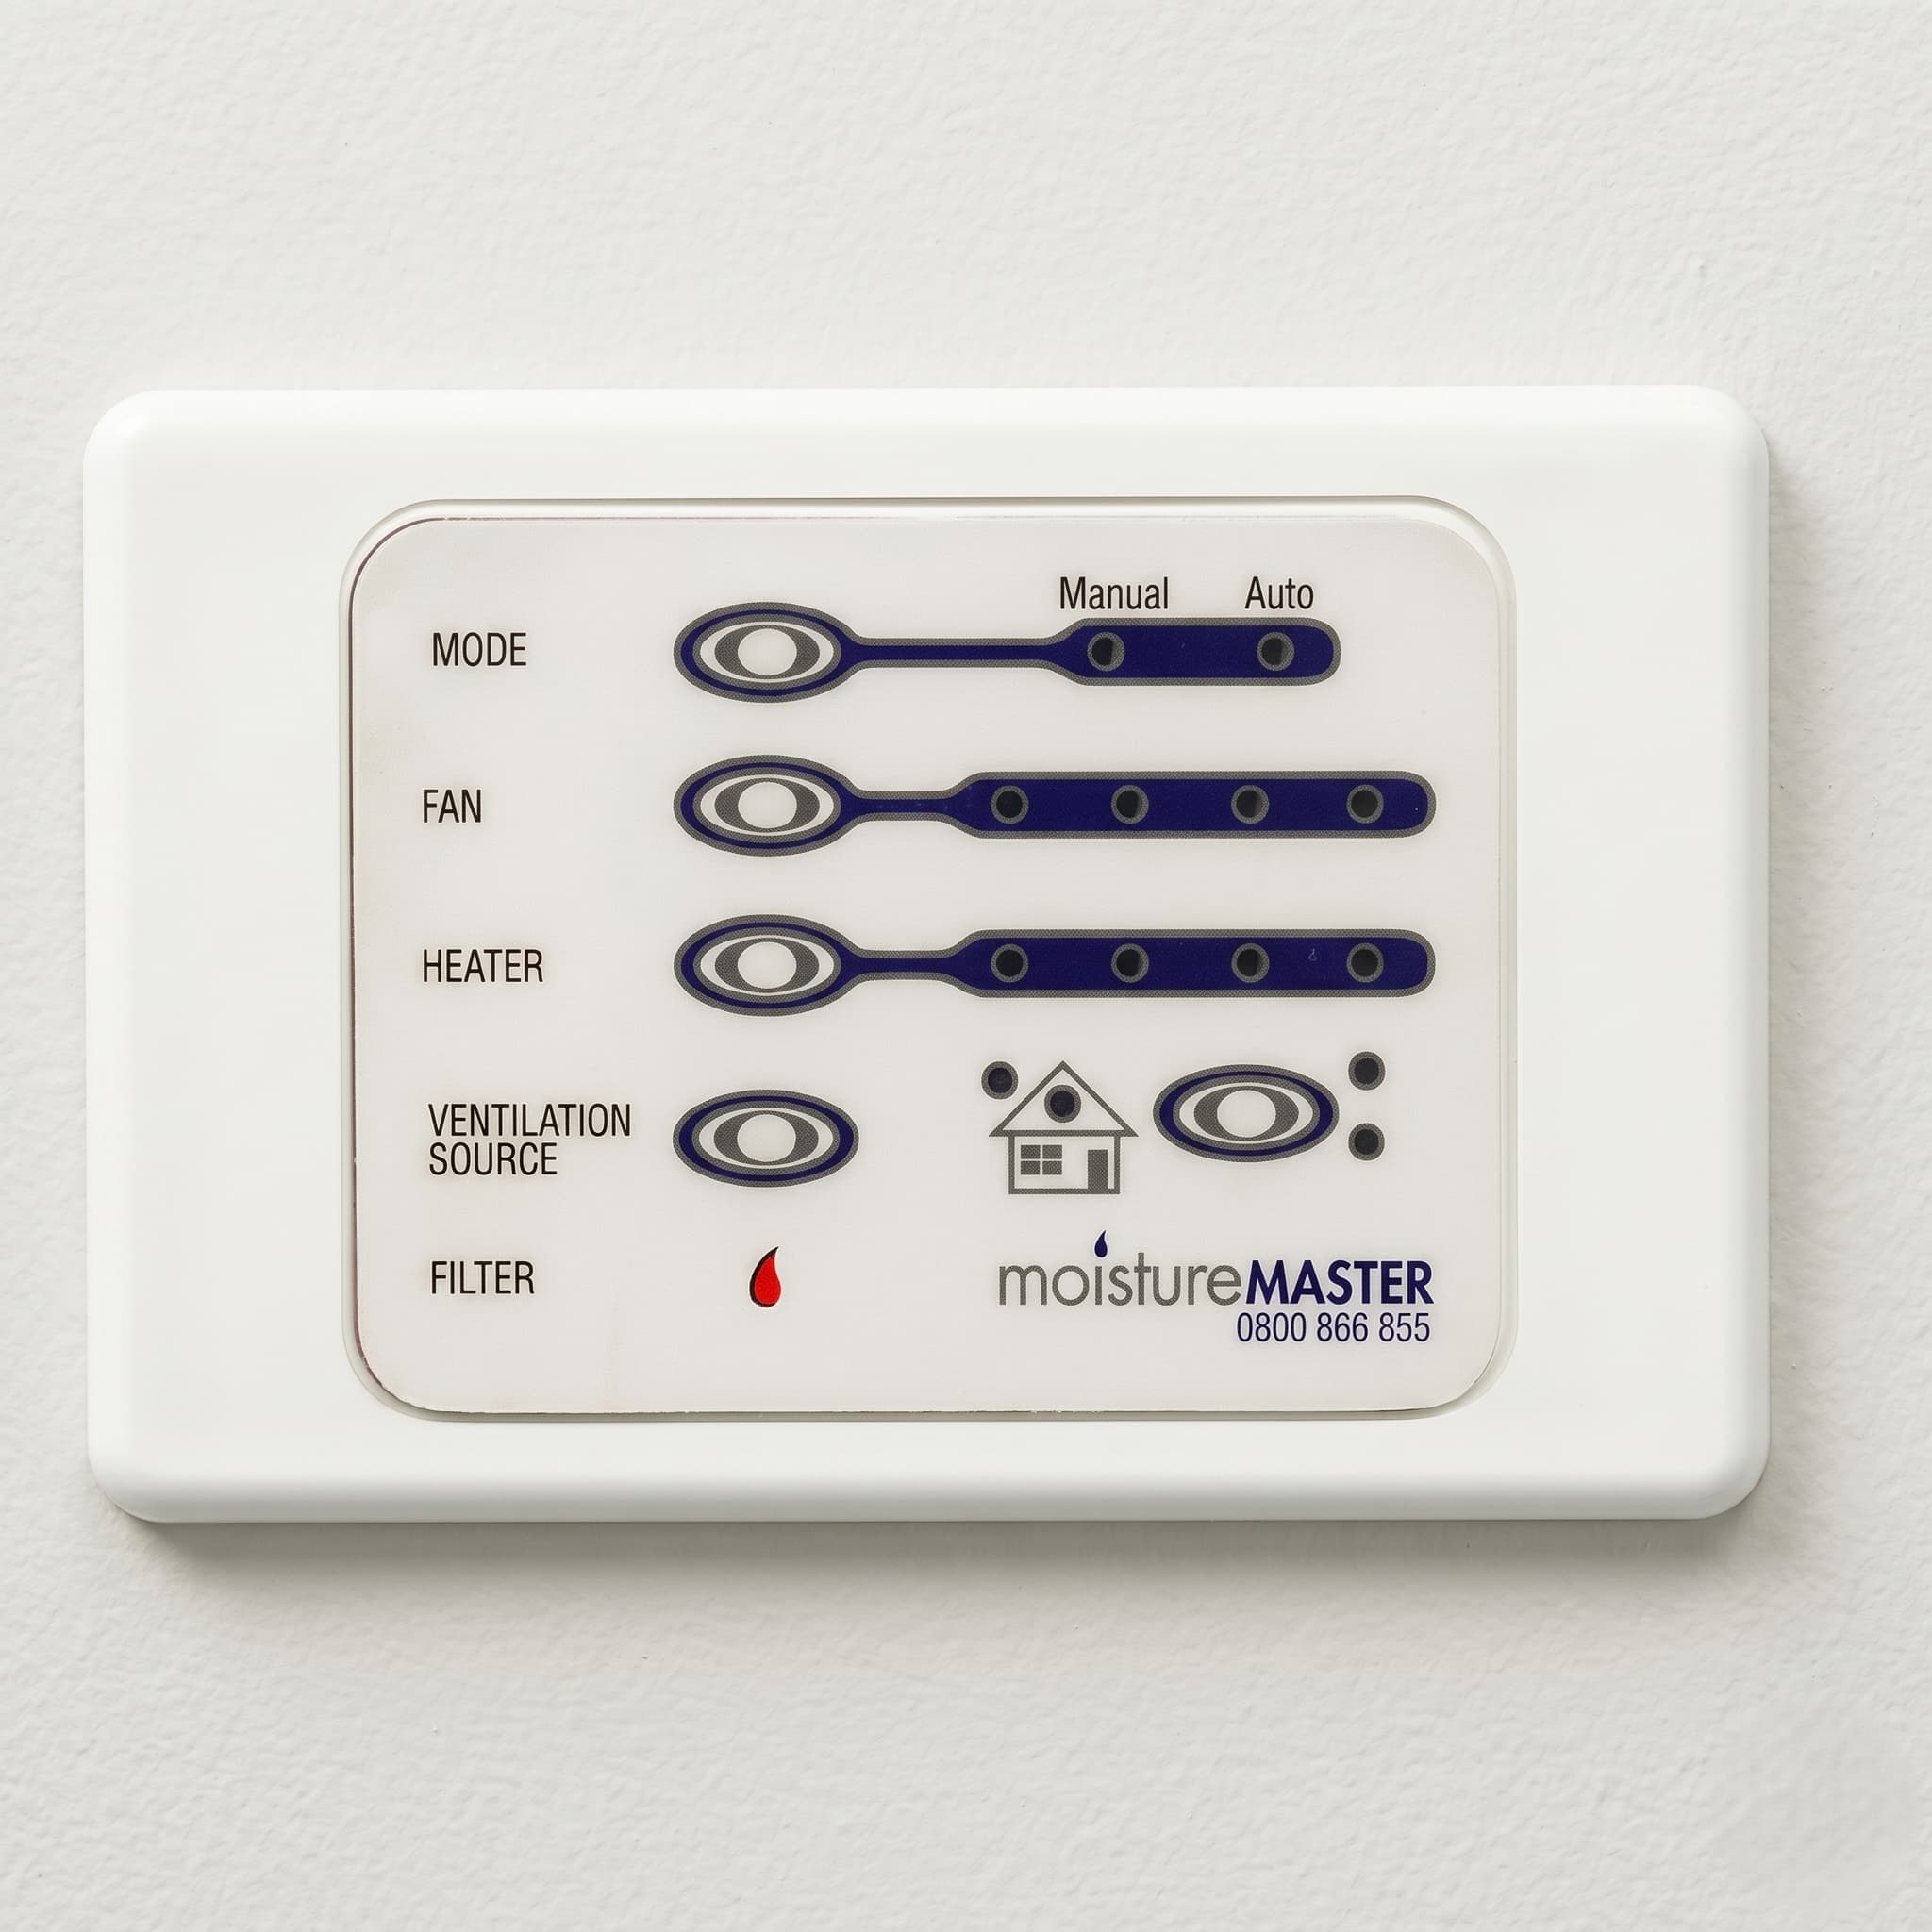
There are three distinct MoistureMaster controller types. Knowing which one is on your wall helps you follow the right instructions throughout this article.
LCD controller (MK7)A rectangular unit with a digital screen showing the time, fan speed indicator, current fan and heat status, and a heater level indicator if a Thermaflow heater is installed. Has a FAN plus button and HEAT minus button on the main screen plus SELECT and MENU buttons. This is the most common type in homes installed from the mid-2000s onward.
LED faceplate controllerA panel with LED indicator lights rather than a digital screen. Shows five rows of indicators: MODE (Manual or Auto), FAN (fan speed), HEATER (heater level), VENTILATION SOURCE (roof or outside air), and FILTER (replacement reminder). Has dedicated MODE, FAN, HEATER, VENTILATION SOURCE, and FILTER buttons. Found on older installations.
Switch controlsA basic manual interface with dial or switch controls. The simplest of the three types and found on the oldest installations.
On the LCD controller: The main screen shows the time, fan speed, heater level, roof cavity temperature, house temperature, and a fault indicator. Press the FAN plus button to cycle through available fan speeds. Press the HEAT minus button to cycle through heater levels if a Thermaflow heater is installed. Press MENU to move through the settings menu.
The LCD controller has two operating modes: Auto and Program. In Auto mode factory-set parameters apply. In Program mode you have full control over temperature parameters including the Summer Cutout and Winter Cutout. To switch between modes, press and hold MENU for 15 seconds.
On the LED faceplate controller: The MODE button selects between Manual and Auto. In Manual mode the FAN button cycles through off, 1, 2, 3, and 4 (for four-speed fans) or off, 1, 2, 3 (for three-speed fans). In Auto mode the fan cannot be turned off completely. The HEATER button cycles through heater levels 1 to 4 when a Thermaflow heater is installed.
The VENTILATION SOURCE button shows whether air is being drawn from the roof cavity or outside. If you do not have an outside air supply kit connected, this button must be held for 4 seconds to change the source setting, which prevents accidental switching.
Your controller has a Winter Cutout setting. When the roof cavity temperature drops below the set threshold, the system turns off completely rather than pushing very cold air into the home.
The manufacturer's position on this setting is clear: leave it off and keep the system running at all times. When the system stops supplying fresh air, condensation and dampness return. A system running continuously at a lower fan speed is more useful than one that has been switched off, even on cold winter mornings. The manufacturer also notes that using the Low Temperature Cut-out setting invalidates the guarantee for condensation control.
For more on why cold air from a positive pressure system in winter is normal operation rather than a fault, why your ventilation system blows cold air in winter covers this directly.
If you want to adjust this setting regardless, here is how on each controller:
LCD controller: Hold MENU for 15 seconds to enter Program mode. The Winter Cutout setting is adjustable from off to 0°C through to the Heater Cutout temperature in 1°C steps. Default is off.
LED faceplate controller: Hold the MODE button for 10 seconds then release. Press MODE repeatedly to cycle through off, then 6°C through 18°C in 2°C steps. The Fan LEDs show the tens digit and the Heater LEDs show the units. Wait 10 seconds after selecting the desired temperature and the programming completes, confirmed by the touch pad lights flashing.
The Summer Cutout pauses the system automatically when the roof cavity temperature exceeds a set threshold, to prevent the system from pushing overheated air into the home. In summer the roof cavity can reach temperatures that make the system counterproductive without it.
LCD controller: The factory default Summer Cutout is 28°C. In Program mode it is adjustable between 24°C and 40°C in 1°C steps.
LED faceplate controller: The factory default is 28°C. To adjust, hold the FAN button for 10 seconds then release. Press the FAN button repeatedly to cycle through 20°C to 32°C in 2°C steps. Wait 10 seconds and the programming completes.
If a Summer Kit or motorised damper is fitted to the unit, the system can automatically switch from drawing roof cavity air to drawing cooler outside air when the Summer Cutout temperature is reached. This extends the useful operating hours on hot days. Without the kit, the system pauses when the roof cavity exceeds the cutout threshold and restarts when it cools.
There is no dedicated one-touch boost function on the standard MoistureMaster. On a warm summer evening when you want to flush accumulated hot air from the roof cavity before sleeping, the manual approach works well. Open some windows or doors, then increase the fan speed using the FAN button on the LED controller or the FAN plus button on the LCD controller. Run it at the higher level for 30 to 60 minutes, then drop the fan back to the normal setting and close the windows. The system will continue running overnight at the lower level. Remember to reduce the fan speed before the following morning, as a level left high will push a meaningful volume of hot roof air into the home during the next day.
Some MoistureMaster units include an optional Thermaflow heater. This is an electrical resistance element inside the roof unit that warms incoming air before it enters the home, which allows the system to run in cold conditions without cold air becoming a problem.
How to check if the unit has one: On the LCD controller, a Heater Level Indicator is visible on the main screen if a heater is installed. On the LED controller, the HEATER row of lights is active and the HEATER button functions. If neither appears, the unit does not have a heater.
The Thermaflow heater is rated at 2300W at full capacity. The four heater levels work as follows: level 1 equals 575W, level 2 equals 1150W, level 3 equals 1725W, and level 4 equals the full 2300W. The heater cycles on and off within each level rather than running continuously, which is how the intermediate levels are achieved.
On the LCD controller, Auto Heat mode allows the heater to run automatically based on roof temperature. Under 0°C the heater runs fully on. Below 5°C it runs at three-quarter power. Below 10°C it runs at half power. Above 10°C the heater reverts to manual control. A timer mode is also available for scheduling operation around specific hours.
On the LED controller, Programme Heat mode works the same way: under 0°C full on, below 5°C three-quarter power, below 10°C half power, above 10°C manual control. Activate it by holding MODE while pressing HEATER. In this mode there is no manual control over heater levels. Turn it off the same way.
The LCD controller includes a Cost Control Programme that lets you set a monthly budget and tracks what the heater is costing to run. Running an electrical resistance element to heat roof cavity air is expensive compared to a heat pump handling the same heating load. The Cost Control Programme is worth using before committing to regular operation.
A professional service should confirm the element is functioning correctly and that the wiring is in good condition regardless of whether you plan to use it. That is not a DIY inspection.
Your MoistureMaster uses a G4 grade circular disc filter, 330mm in diameter. It sits in a cassette inside the roof unit and twists out for replacement. G4 captures dust, pollen, and larger airborne particles before the air reaches your living areas.
The manufacturer-recommended replacement interval is every 12 months. Many systems have gone longer between changes. A filter that has not been replaced for several years restricts airflow, which means the fan works harder and delivers less air. The moisture management the system is supposed to provide becomes less effective as airflow drops.
The 330mm G4 disc is an industry-standard size and can be sourced through MoistureMaster directly or through independent maintenance providers. The old filter needs to be physically replaced, not washed. Washing destroys the filtration media. A washed filter looks cleaner but performs far worse than a new one.
If the unit is a Nuaire Drimaster or Flatmaster, the filter is different. The Drimaster uses two smaller 203mm G4 discs supplied as a pair. The Flatmaster uses a 280x280x25mm flat panel filter with a carbon layer. Both variants are less common in NZ than the standard unit. Confirm the model before ordering parts.
LCD controller (MK7): The screen displays "TIME TO CHANGE FILTER." After replacing the filter, press and hold the MINUS and MENU buttons together for 15 seconds. The screen will show "PRESS MENU TO ADVANCE." Press MENU once and the filter timer resets for 12 months from that date.
LED faceplate controller: The FILTER light illuminates after one year of runtime. After replacing the filter, press and hold the VENTILATION SOURCE button for 10 seconds. The light goes out only after you release the button. Holding for 10 seconds also resets the filter counter even if the filter light is not currently showing, which means you can reset it immediately after a filter change without waiting for the light to appear.
Switch controls: If the reminder does not clear with standard button holds, contact a service provider to confirm the correct process for your specific unit.
If the reminder returns shortly after a reset, the filter was likely replaced but the counter was not fully cleared. Work through the sequence again from the beginning.
A professional service covers the fan housing, ducting runs, ceiling diffusers, and system performance. These are the components the filter change does not reach.
The filter sits in the roof cavity between the fan unit and the ducting runs that supply the ceiling diffusers. What bypasses the filter, or what collects in the fan housing itself, is not visible from inside the house and is not addressed by a filter change alone.
A professional service opens the fan housing to inspect and clean the internal components. It checks the ducting runs for sections that have disconnected or partially collapsed, which reduces airflow to the rooms those runs serve. It clears the ceiling diffusers, which collect dust on the face and inside the body over time. If a Thermaflow heater is installed, its condition and wiring are confirmed as part of the roof unit inspection. Airflow is verified at each vent after the work is done. A written condition report documents the findings.
Most MoistureMaster systems have only ever had filters changed. A housing that has never been opened, ducting that has never been checked, and diffusers that have never been cleared. That is not a fully maintained system.
MoistureMaster offers a 5-year warranty on its systems.
MiHT is a maintenance-only provider. We do not sell or install systems, which means the recommendation you get is based solely on what the system needs. For the full scope of what a professional ventilation service involves, this article explains the complete process. To see what a MiHT ventilation care visit involves, visit the ventilation care page. For the full range of positive pressure ventilation services, visit the positive pressure ventilation service page.
Age does not mean replacement is inevitable. Many MoistureMaster units that are 15 to 20 years old are still running well. A service visit is the only way to know what condition the unit is actually in. Both are the components most likely to show wear on units of that age.
A service visit confirms what condition the unit is actually in, which components are functioning correctly, and whether anything needs attention. For a system that is otherwise running, maintenance costs far less than a new installation. You end up with documented knowledge of what you have rather than a guess.
Your system has no way of telling you from inside the house that its output has dropped. A filter running past its service interval restricts airflow gradually. A fan housing that has never been cleaned accumulates what the filter missed. A house that starts feeling stale, or showing window condensation it was not producing before, often has a system that has simply been deferred too long. That is the Healthy Home Blindspot. The system installed to protect the indoor environment becomes the source of the problem while continuing to run.
For signs that a system may be overdue for attention regardless of brand, signs your home ventilation system needs professional attention covers what to look for.
If the controller is blank, unresponsive, or showing a fault that is not the filter reminder, that is outside the scope of settings and maintenance. This article on ventilation system fault signs covers what those indicate and what to do.
The system reduces the conditions that allow mould to develop by keeping drier, filtered air circulating through the home. It is not a mould treatment and cannot address mould that is already established. When the system is maintained and airflow is adequate, it works against the moisture conditions mould needs. When the filter is blocked or the system is off, that protection disappears. A service that confirms airflow is at the right level is the practical way to know the system is doing its job.
Washing the G4 disc filter destroys the filtration media. The fibres that capture airborne particles are not designed to survive water. A washed filter looks cleaner but performs far worse than a new one. Replacement filters are available directly from MoistureMaster and through independent maintenance providers.
MoistureMaster sells filters directly, and Independent maintenance providers can also supply the standard 330mm G4 circular disc, as it is a widely stocked size. If you are not certain which unit you have, confirm the model before ordering. Nuaire Drimaster units use two 203mm G4 discs and the Flatmaster uses a 280x280x25mm flat panel filter with a carbon layer.
Whole-house positive pressure ventilation systems are not a requirement under the Healthy Homes Standards. The system was installed by choice, not obligation. If you are a landlord, there is no legal requirement to maintain the positive pressure ventilation system as part of Healthy Homes compliance, though keeping it functional is good practice for tenant health and the long-term condition of the installed asset.
A filter change handles one component. The fan housing, duct runs, ceiling diffusers, airflow performance, and Thermaflow heater if present are not touched by a filter swap alone. Most of these systems have not had a full service since installation. A professional service covers all of these items and ends with a written condition report. Whether you start with a filter change or a full service depends on how long the system has been running without any professional attention.
If the controller display is faded, unresponsive, or showing an error you cannot clear, note what it is displaying and contact a service provider. Controllers on units that are 15 or more years old can develop faults with age. A technician can assess whether the controller needs replacement or whether the issue can be resolved at service.
Your MoistureMaster, like an HRV or DVS, is a positive pressure ventilation system that draws air from the roof cavity and pushes it into the home. The meaningful differences are in the filter type, controller design, and service specifics. The standard unit uses a 330mm G4 circular disc rather than a bag or square cartridge filter, and some models include the optional Thermaflow heater. Each brand has distinct maintenance requirements, which is why brand-specific guidance matters.
If you want to know where your home's energy systems actually stand, the Home Energy Health Assessment at assessment.miht.co.nz takes around three minutes.
Now you know which controller you have, what the settings do, how to manage the filter, and what a proper service involves beyond the filter change. That is enough to get genuinely useful performance out of the system from here on.